In our experience, databases tend to be the sticking point of most migrations away from Heroku. Especially for Heroku Enterprise users managing Postgres at scale, moving hundreds or thousands of gigabytes of mission-critical data with minimal service interruption poses a unique challenge. DB storage utilization, DB downtime, and special extensions are all additional factors we've had to consider while migrating terabyte-scale databases from Heroku to Amazon RDS as part of our migration program.
In this article, we will summarize the three main migration strategies we've explored for moving Postgres from Heroku to RDS - ranging from simple Postgres dumping/restoration to WAL-based replication pipelines - and discuss the benefits and drawbacks of each.
Option #1 - Keeping it simple pgdump and pgrestore
The main advantage is that everything is based off of Postgres’ own native tooling and the process is completely bare-bones. Dumping and then restoring the native dump works especially well for much smaller databases that aren't larger than 10GB in size since Postgres compresses the native dumps quite efficiently. The native dumping mechanism happens to be faster than doing a text/SQL dump and so we could also shorten downtime windows.
We did, however, occasionally encounter some interesting problems:
- If a customer is using a Postgres extension with a particular version on Heroku, the same version has to be installed on RDS. Unfortunately, that’s not always straightforward - if the Heroku and RDS DB versions don’t match up, the extension versions may not match either. This can lead to all sorts of problems while trying to do native dumps, since there’s no way to directly tweak the extension version.
- This leads to the second problem - native dumps are typically more reliable and less error-prone than text/SQL dumps, but if you have to use a SQL dump (to tweak an extension or some other aspect of the DDL), you can end up introducing other errors during the restoration. Oftentimes these errors won't make much sense, like the apparent absence of a foreign key in a particular table.
- Finally, any database larger than 10GB ends up being subject to noticeable network latencies, and woe betide you if a dump breaks in the middle because you lose network connectivity. There are ways to automate this, but with other available options that felt to us like overkill.
Still, going for this method makes a lot of sense if:
- The database isn’t using Postgres extensions and the versioning between Heroku and RDS matches up perfectly.
- The database doesn’t exceed 10GB in size.
Option #2 - Hitting a wall with WAL
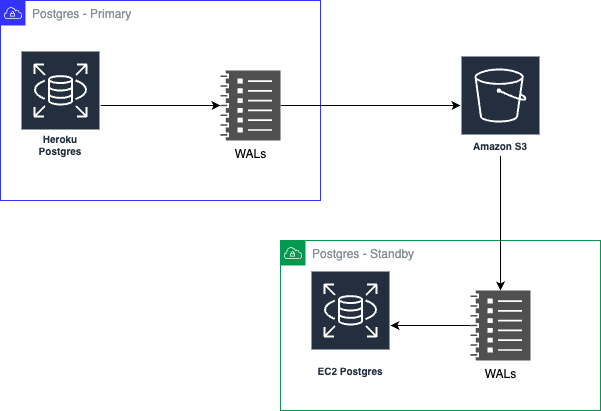
At this point, we started to investigate others’ experiences with using Postgres Write-Ahead Logs (WAL) to asynchronously replicate data between two Postgres instances.
Before we look at what WALs are about, it's worth acknowledging that Heroku did a terrific job with introducing the concept of using WALs to ensure a continuous level of data protection for Heroku Postgres instances. They introduced this way back in 2013 as part of an open source project called WAL-E. It’s quite useful when it comes to database recovery - or say, to audit how data has mutated. When it comes to replication, the idea is to continuously use the WAL from one Postgres database and replay it against a blank one to recreate the DB. More popularly, this is known as streaming replication.

The process is slightly tricky - we deploy a bare instance of Postgres on a fresh EC2 VM and install wal-g which is an updated version of wal-e. At this point, we shut down the database running on the VM, create a new folder to hold the Postgres DB's contents, and place a script on the server for carrying out the initial ingestion. An example script would look like this:
It all sounds solid - powerful, even.
There are, however, some notable limitations we've discovered:
In our opinion, running a WAL-based replication makes a lot of sense if you’re looking at generating a one-time copy of your Heroku database and you wish to run the exact sequence of queries that were run against your Heroku DB. If you’re looking at achieving asynchronous streaming replication however, you should expect to sort through a number of moving pieces and potential issues without a lot of documentation.
Fortunately, at this point we found Bucardo.
Option #3 - Bucardo
Bucardo is… well, I’ll let Bucardo’s nicely-written FAQ explain:
Bucardo is a replication program for two or more Postgres databases. Specifically, it is an asynchronous, multi-source, multi-target (sometimes known as master-master and master-slave or master-standby) table-based replication system. It is written in Perl, and makes extensive use of triggers, PL/PgSQL, and PL/PerlU.
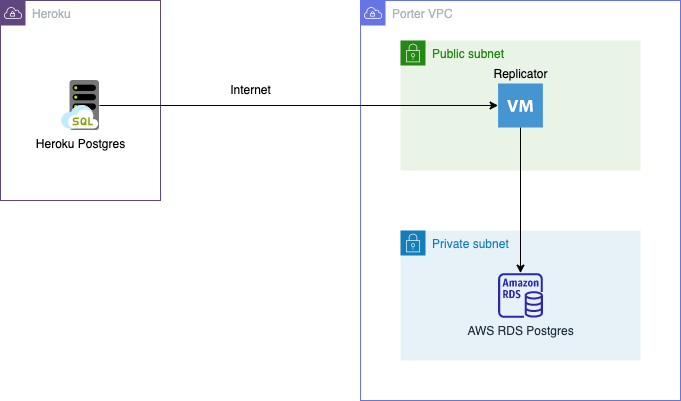
Here’s how our migration process with Bucardo works:

When the pipeline is run for the very first time, it performs a one-time copy that syncs all rows from all tables on Heroku to RDS. Once this one-time sync is complete, it switches to delta mode, where it only copies changes to tables (i.e., additions, modifications, and deletions).
A slightly advanced mode is where the replication pipeline is responsible for two-way syncing. This involves data being synced in real-time from Heroku to RDS and from RDS to Heroku. This can come in handy for users looking to maintain the same database in two locations if you want to take your DB migration low and slow.
Our first brush with Bucardo involved testing a scenario where a Heroku Postgres database with about 16 million rows was moved to RDS. Setting up the pipeline took about 10 minutes, and then… sheer magic. Bucardo took over and replicated the entire database smoothly before automatically settling into delta mode, where it kept watching for row updates to the Heroku database replicated them asynchronously to RDS.
Pretty rosy, right? Of course, there were still some pitfalls:
- The most important factor here is that each table in the source database must have a primary key column defined. This is to ensure that the replication pipeline is able to track row changes, and the primary key is what enables the pipeline to track each row.
- While the replication pipeline is running, it’s a good idea not to make schema changes to the source database as this can lead to drift between the source and the destination. This may be circumvented by using database migration tools and ensuring that any schema changes are applied as migrations to both the source and target DBs. In the event where the source database receives migrations first, the replication pipeline will pause upon encountering a schema drift. A subsequent migration applied to the target database will then jump-start replication again.
- If the database has any materialized views defined, these would typically be recreated without any data; it is then necessary to run a manual query to jump-start the process of populating such views. To that end, it is a good idea to take note of all materialized views so that they can be repopulated during the migration exercise.


